Some techs long for the “good old days” of mechanical controls, when troubleshooting appliances was supposedly simpler. But the universal use of electronic controls nowadays actually provides many troubleshooting benefits — in particular in the form of error codes and diagnostic modes.
The purpose of error codes is for the control to tell you its best guess of what’s wrong, based on the algorithms programmed into it by the engineers. Note that the engineers’ best guess is sometimes a very different thing from what’s actually going on, so while error codes are great as a data point to guide your troubleshooting, don’t take them as gospel.
Diagnostic modes are, in general terms, a way for you to interact with the control and have it run certain loads, perform a self check, display data about its operation, or some combination of all three. Oftentimes, you can display error codes as part of a diagnostic mode.
How exactly diagnostic modes are implemented varies widely from model to model, so let’s walk through some of the different and discuss their relative usefulness.
Automatic Test Cycle
First up, we have one of my least favorite diagnostic modes: the automatic test cycle that you’ll often find in Whirlpool dishwashers.
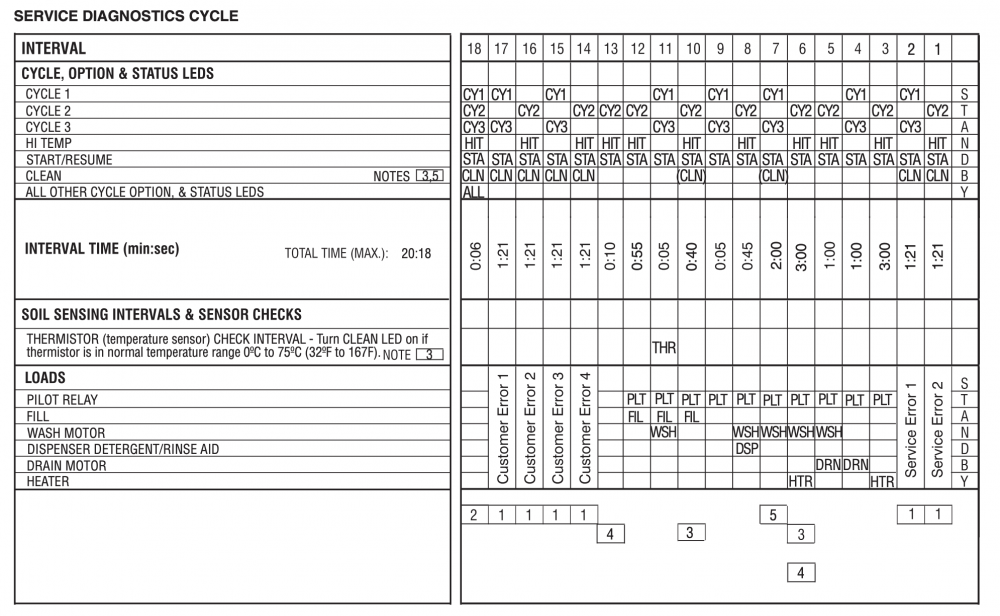
This one is a pain for multiple reasons — one being that it can be hard to understand the chart in the first place. All it’s trying to show is information about each step of the automatic test cycle with the columns. The top rows show which indicator lights are shown during each step, the middle shows how long each step lasts, and the bottom rows show which loads are active during each step.
As you can see from the first few columns of the test, this diagnostic mode displays the 4 most recent error codes before proceeding with the test. By default, it will display each error for 1 minute and 21 seconds, but there’s a key you can hit to skip steps of the cycle.
The most annoying bit about this one is when you want to test a particular load while it’s running. For example, if I want to check the dispenser, that load only runs during a single step of the diagnostic mode (roughly in the middle), and it only runs for 45 seconds. So I need to be all set up and ready to take my measurements during that window. If I miss it, then I need to restart the entire cycle and advance it to the dispenser step.
Forced Run Mode
Here’s a pretty standard — and fairly useful — diagnostic mode. In this one, you’ve got different steps that you can freely cycle through. Each step, when activated, energizes a particular load’s circuit. This is a great, super easy way to perform tests on loads while they’re running, and it also lets you determine if a load is incapable of being run at all, or if the control is simply deciding not to run it during normal operation.
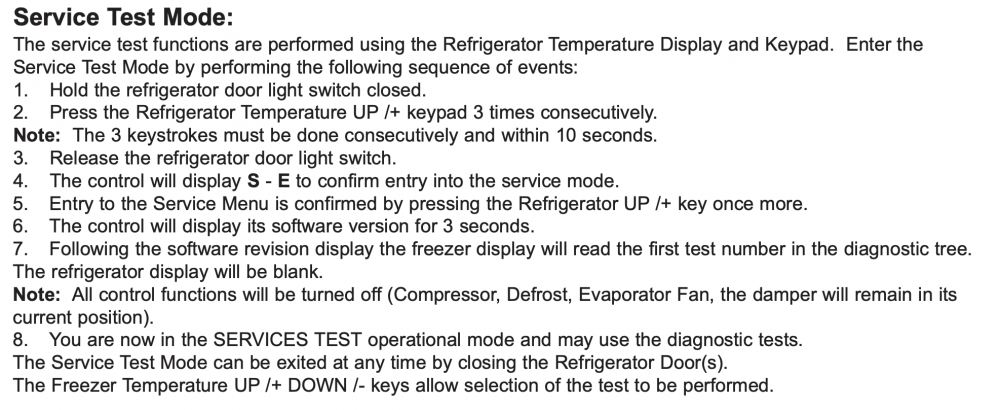

In the snippet that I’ve shown here, you’ve got some very simple and useful forced operation tests on the defrost circuit, compressor, and fans in this refrigerator. That’s great.
What’s less great are those thermistor tests. Don’t get fooled by these. The results of these automatic thermistor tests tells you basically nothing. Why? Because thermistors almost never fail open or shorted, and that’s all these test are checking for. Thermistors fail by going out spec, and these test modes can’t check for that.
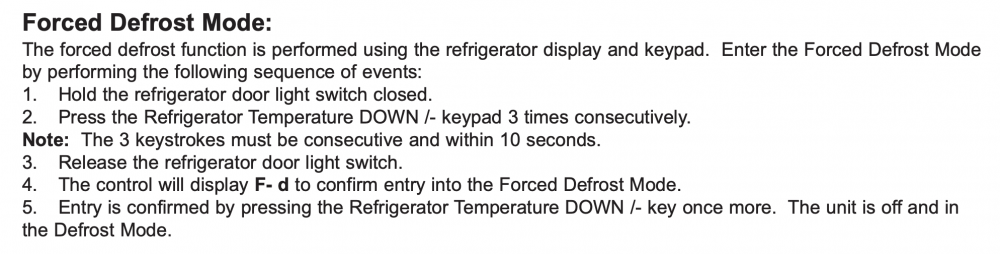
Sometimes, you’ll also get standalone forced modes. For example, many refrigerators have a standalone forced defrost mode, like this:
Or, very commonly, ice makers have their own test harvest mode.

Standalone Error Code Display
Sometimes, you have to enter a completely separate mode in order to make the unit display error codes — in other words, it’s not always bundled into the diagnostic mode.
How error codes are displayed depends on what kind of display you have on the model. If you have a display that’s capable of displaying numbers and letters, usually the error codes are displayed as such:
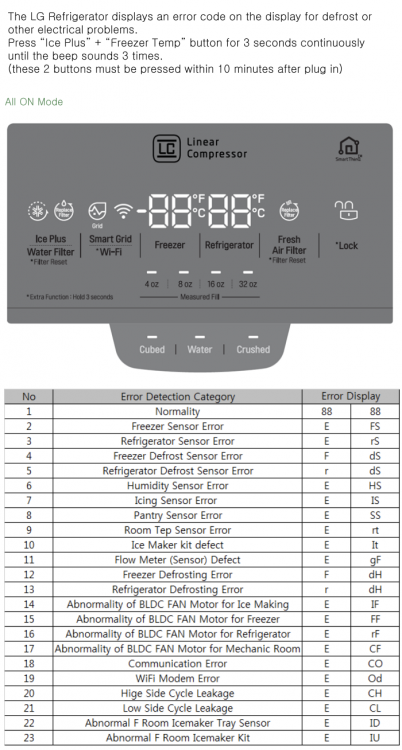
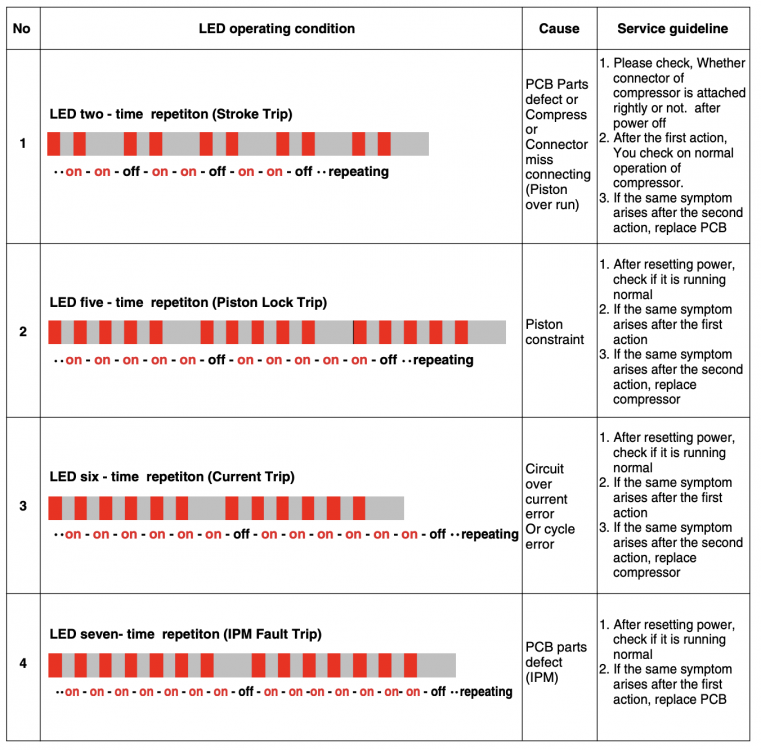
Other times, you just have blinking lights on the console that you have to count to determine the error codes. Or, even more simplistically, some control boards have a blinking LED on the board itself that indicate errors. For example, the compressor errors on this LG refrigerator are displayed via the blinking of a single LED light on the control board.
Load Mode
This is the last type of diagnostic mode we’ll cover here, and it’s one of my favorites. Load mode doesn’t go into a test cycle. Instead, the unit continues running as normal, with the only difference being that the display shows which loads the control is trying to power.
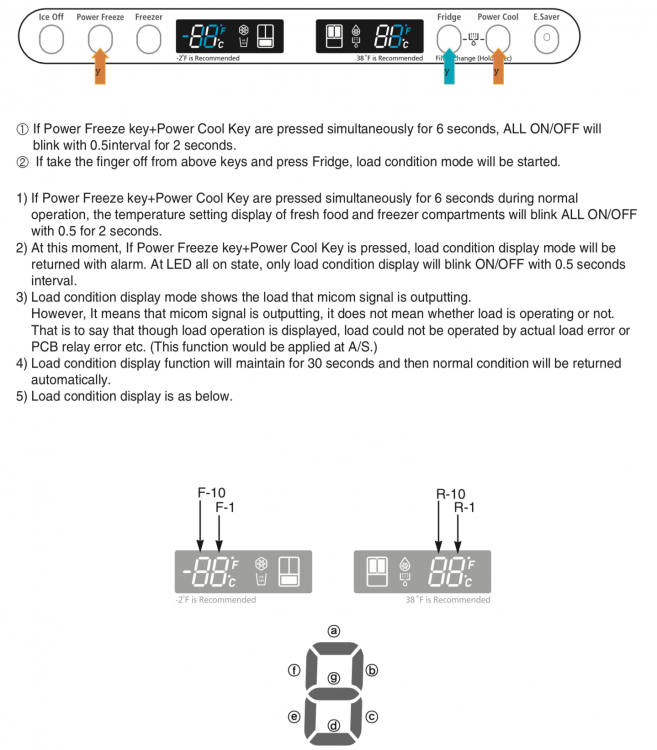
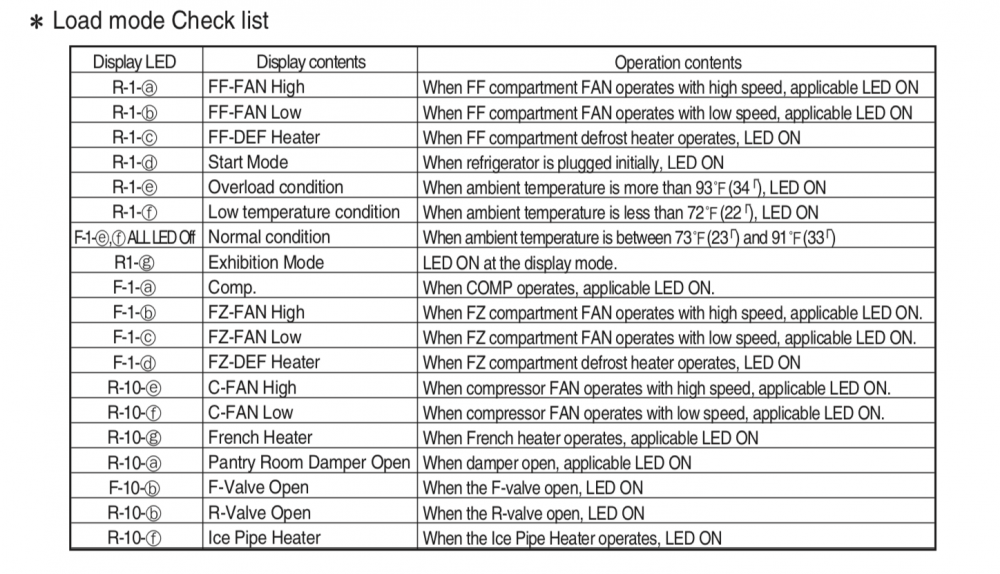
This can be really useful to determine what the control thinks is going on during normal operation. With this mode, you can very quickly determine the reason why a load isn’t running: whether it’s incapable of running even when supplied with power or the control is simply choosing not to run it. It removes a lot of the ambiguity that can arise from troubleshooting an electronically-controlled machine.
Diagnostic mode implementations vary widely from model to model, but they have one feature in common: they are almost always a great help to your troubleshooting. If you’re not consistently retrieving error codes and checking loads of interest in diagnostic mode, you’re missing out on a hugely useful troubleshooting tool. Yet another reason to always get the tech sheet before you head out on a job!
Want to learn more about the intricacies of troubleshooting electronically-controlled appliances? Click below to check out the Core Appliance Repair Training course right here at the Master Samurai Tech Academy.